Introduction
Email alerts integration allows you to configure parsing conditions and create an alert within OpsRamp once the conditions are met.
This document provides instructions on setting up Email Alerts integration in OpsRamp, how to configure the parsing conditions, and steps to validate the conditions.
Configure integration
Follow these steps to configure Email Alerts integration:
Click All Clients, select a client.
Click Setup > Account.
Select the Integrations tile.
The Installed Integrations screen is displayed, with all the installed applications. Click + ADD on the Installed Integrations page.
If you do not have any installed applications, you will be navigated to the Available Integrations page. The Available Integrations page displays all the available applications along with the newly created application with the version.
Note: Search for the application using the search option available. Alternatively, use the All Categories option to search.Click +ADD on the Email Alerts tile.
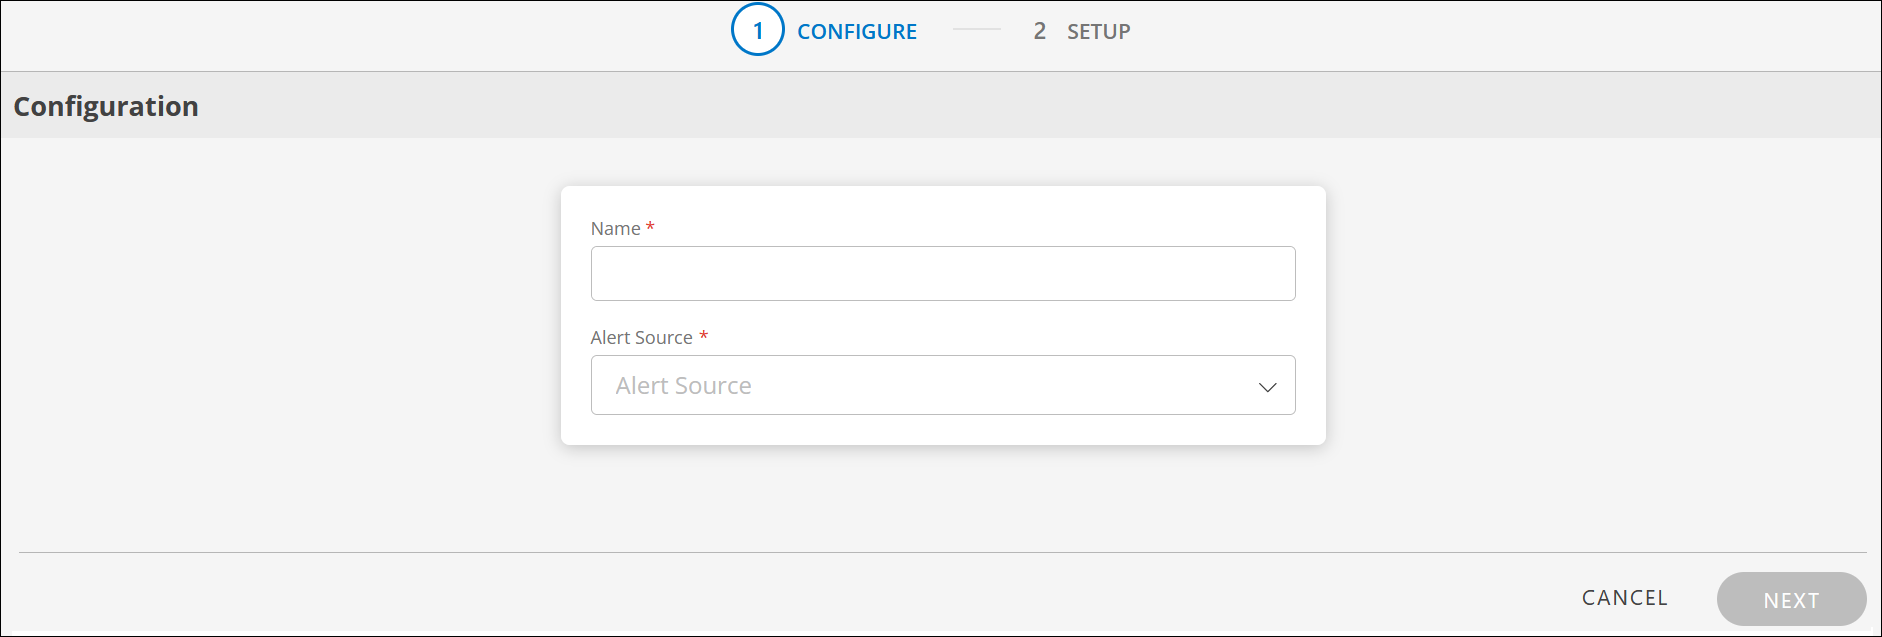
Enter the following information in the Configuration screen:

CONFIGURE
Field Name Field Type Description Name String Enter a unique name for the integration. Alert Source Dropdown Select Email Alerts from the dropdown. Click NEXT. The SETUP screen is displayed.
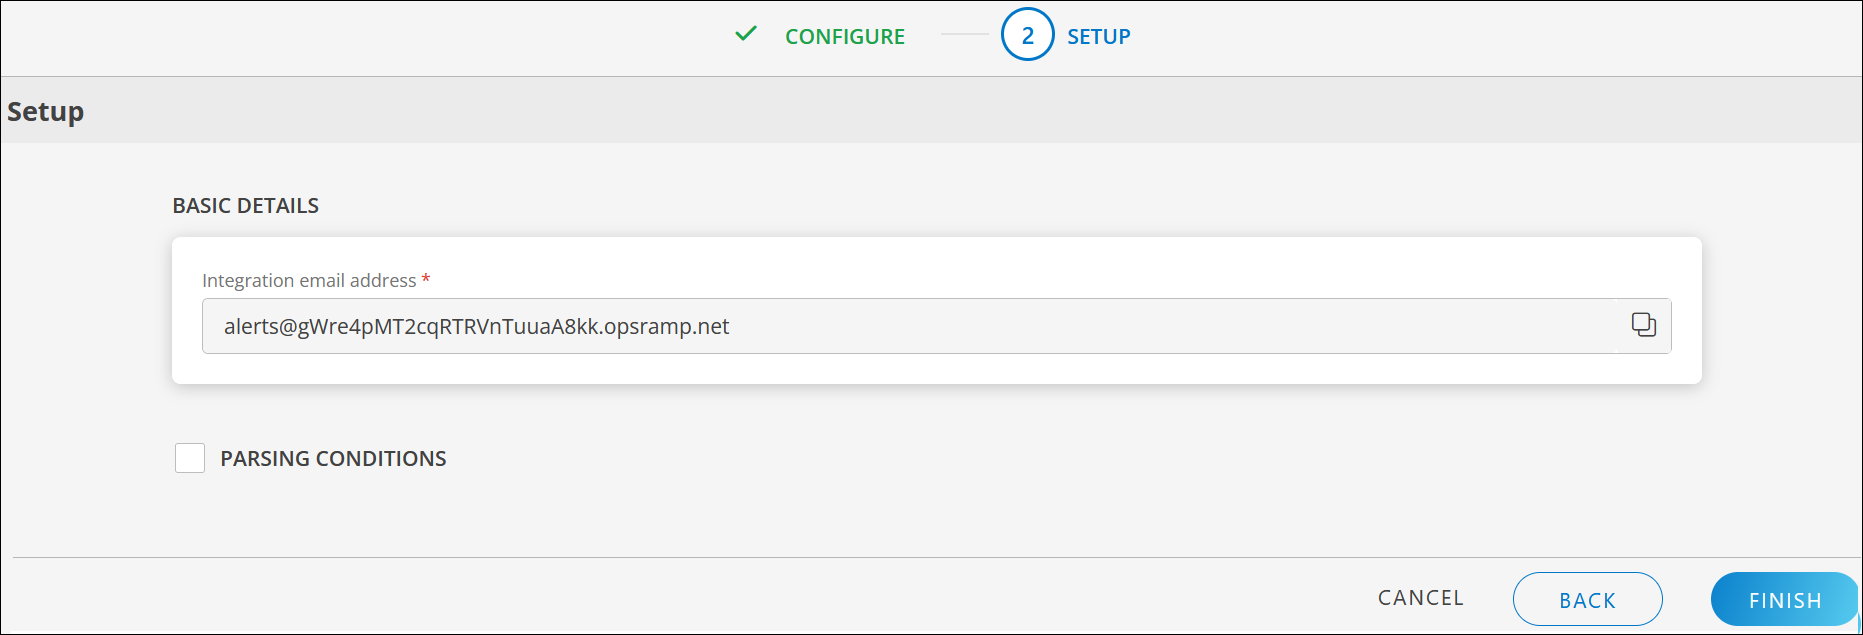
Enter the following information in the SETUP screen:
BASIC DETAILS
Field Name Field Type Description Integration email address String Any email sent to this email address will be parsed with the parsing conditions and an alert is created in OpsRamp.
Make a note of the Email address.PARSING CONDITIONS: Provide Email parsing conditions to create an alert.
- Select the PARSING CONDITIONS checkbox and click +ADD.
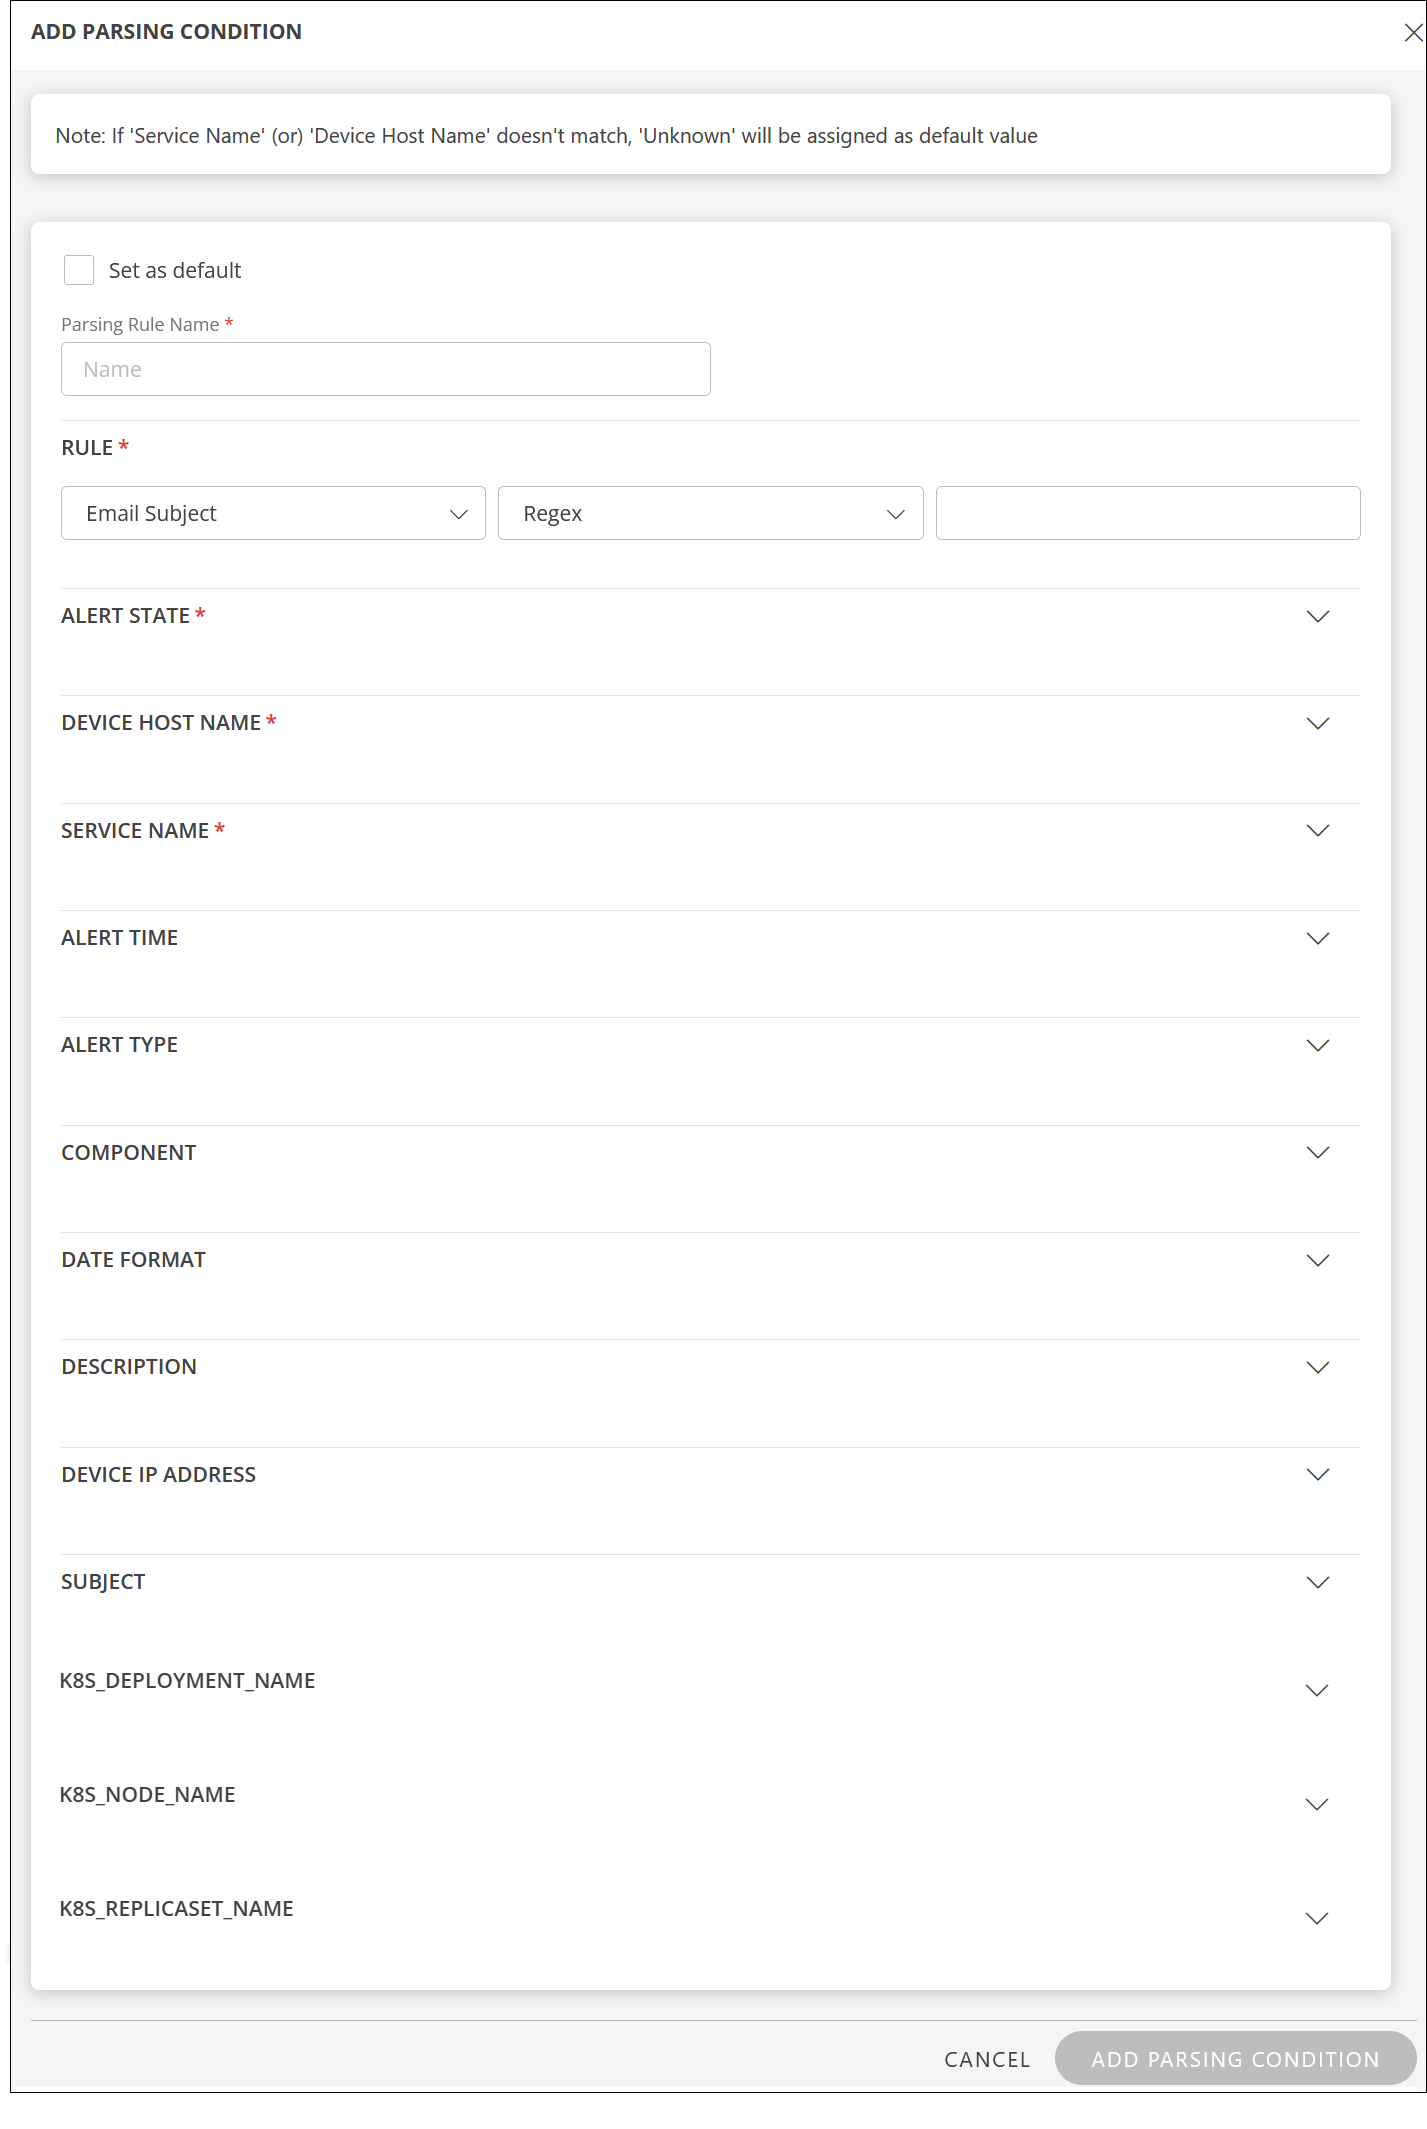
Enter the following information in the ADD PARSING CONDITION window:
Note: If Service Name or Device Host Name does not match, Unknown will be assigned as default value.Field Name Field Type Description Set as default Checkbox Select this option if you want to set the Parsing Rule Name and RULE as default. This will be set as default if the other conditions that you configure are not met. Parsing Rule Name String Provide a name for the parsing rule. ALERT STATE Dropdown Select source and condition from the dropdown lists and enter value(s) in the box(es).
Select Priority from the dropdown.
If the condition is not met, the priority is considered.
To configure map attributes, click +MAP and enter the Third-party Property Value and OpsRamp Property Value.DEVICE HOST NAME Dropdown Select source and condition from the dropdown lists and enter value(s) in the box(es). SERVICE NAME Dropdown Select source and condition from the dropdown lists and enter value(s) in the box(es).
To add more conditions, click +ADD.
To configure map attributes, click +MAP and enter the Third-party Property Value and OpsRamp Property Value.DATE FORMAT String Provide the date format. Provide conditions for the following attributes:
RULE, ALERT TIME, ALERT TYPE, COMPONENT, DESCRIPTION, DEVICE IP ADDRESS, and SUBJECT.Notes:
- If no parsing condition is specified: OpsRamp will default to using body-html (the HTML version of the email).
- If parsing condition is specified: OpsRamp will extract the data from body-plain (the plain-text version of the email) and parse and render using that.
- Custom attributes: All the alert tags configured for the tenant appear in the parsing list. You can configure the parsing conditions as required.
- Click ADD PARSING CONDITION. The parsing condition is added and displayed in the PARSING CONDITIONS section.
You can add multiple parsing conditions.
VALIDATE: To validate the parsing conditions:
Select parsing rule name checkbox and click VALIDATE.
The VALIDATION dialog box is displayed.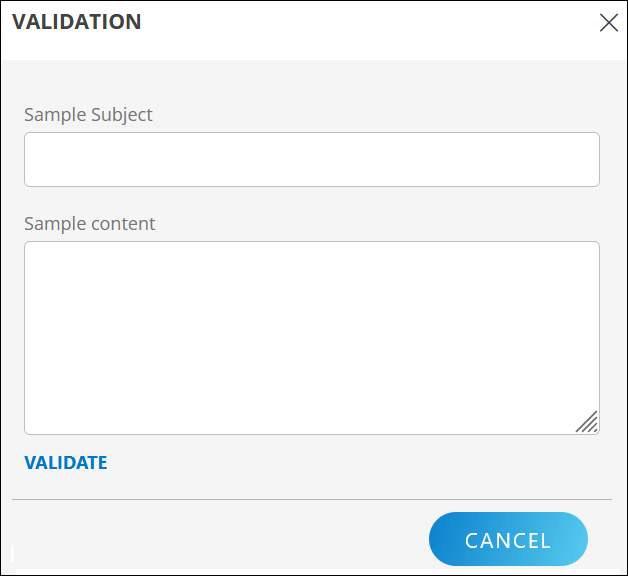
Enter Sample subject and Sample content.
Click VALIDATE. Based on the parsing conditions given, the values are returned.
- To edit the parsing condition, click the three dots (menu) icon and select Edit.
- You have to add at least two conditions in order to remove a parsing condition.
ADDITIONAL SETTINGS: You can configure the integration to post alerts only if the resources are managed by OpsRamp. For resources that are not managed, the events are dropped and not processed.
- Select the Drop alerts from unmanaged resources checkbox as needed.
Click FINISH. The integration is installed and listed under Installed Integrations.

Next steps
- Create an alert using email:
- Compose an email with alert subject and alert content.
- Send the email to the copied incoming email address. OpsRamp processes the alert content with the parsing conditions and creates an alert. The alert created is displayed on the Alerts page.
Actions on Integration
You can perform actions like View Logs, Export, Edit, Assign Templates, and Uninstall on the integration.
- See Actions on Integration for more information.
Audit Logs
View Inbound logs from the View Logs option for the integration. You can view if the event was successful or not.
See Audit Logs for more information.