ManageEngine Password Manager (MPM) is a web-based application that provides privileged account security and remote access management. This password management solution securely stores and manages sensitive information such as passwords, documents, and digital identities.
Prerequisites
The following gateway types are required and must be set up:
Active gateway server: Install on all the resources/resource environment on which ManageEngine Password Manager application is hosted.
Standby gateway server: Serves as a backup of primary gateway server, the active gateway.
Gateway Installation Purpose
Virtual Instance Requirements
Gateway for Password Vault Integration
Virtual CPUs, 4 GB RAM / 50 GB HDD / 1 NIC
Supported hypervisors are VMware ESXi, Citrix XenServer, Microsoft Hyper-V and KVM
Ensure that the resource associated with this integration is onboarded.
Custom attributes
Custom attributes allow you to extend the set of properties that define a resource to include your information. For example, you can create a custom attribute, Asset Tag, and specify a value for each resource. These custom attributes and values control how a resource is managed.
In this integration, custom attributes help you to fetch the privileged resources information, such as account and password from MPM. You can then map resources with MPM resources using custom attributes.
Following are the steps that describe how to:
Create custom attributes
Assign a value to the custom attribute, and
Assign the custom attribute to resources
Step 1: Create custom attributes
Follow these steps to create custom attributes:
From All Clients, select a client.
Go to Setup > Custom Attributes > Custom Attributes and click +.
In the Create Custom Attributes dialog box, fill the following details:
Scope: Select a scope. It specifies for whom the custom attribute is applicable.
Partner refers only to a Partner. However, clients under the partners can also inherit the attribute.
Client refers to a specific Client. You can also select the required client from the Client drop-down option.
Service Provider refers to the service provider.
Select a partner or client from the drop-down list based on the scope selected. If you have selected partner as scope, select a partner from the drop-down list. Similarly, if you have selected client as scope, select a partner and client from the drop-down lists respectively.
Custom Attribute Type: Enter a unique name for the custom attribute. Example: Resource Account Number
Description: Enter a description for the custom attribute.
Click Submit.
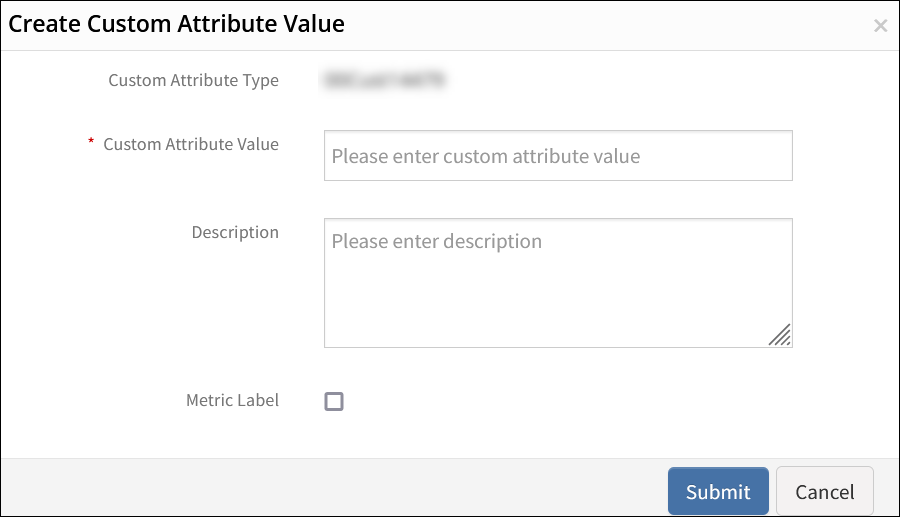
Step 2: Assign a custom attribute value
From Custom Attributes, click + and enter the following to assign a custom attribute value:
Custom Attribute Type: Displays the name established previously.
Custom Attribute Value: Enter a unique value.
Description: Enter a description for the custom attribute value.
Metric Label: Select the Metric Label checkbox to add this custom attribute as a label to your resource metrics, that can be queried in dashboards and other product areas. See Custom Attributes for more information.
Click Submit.
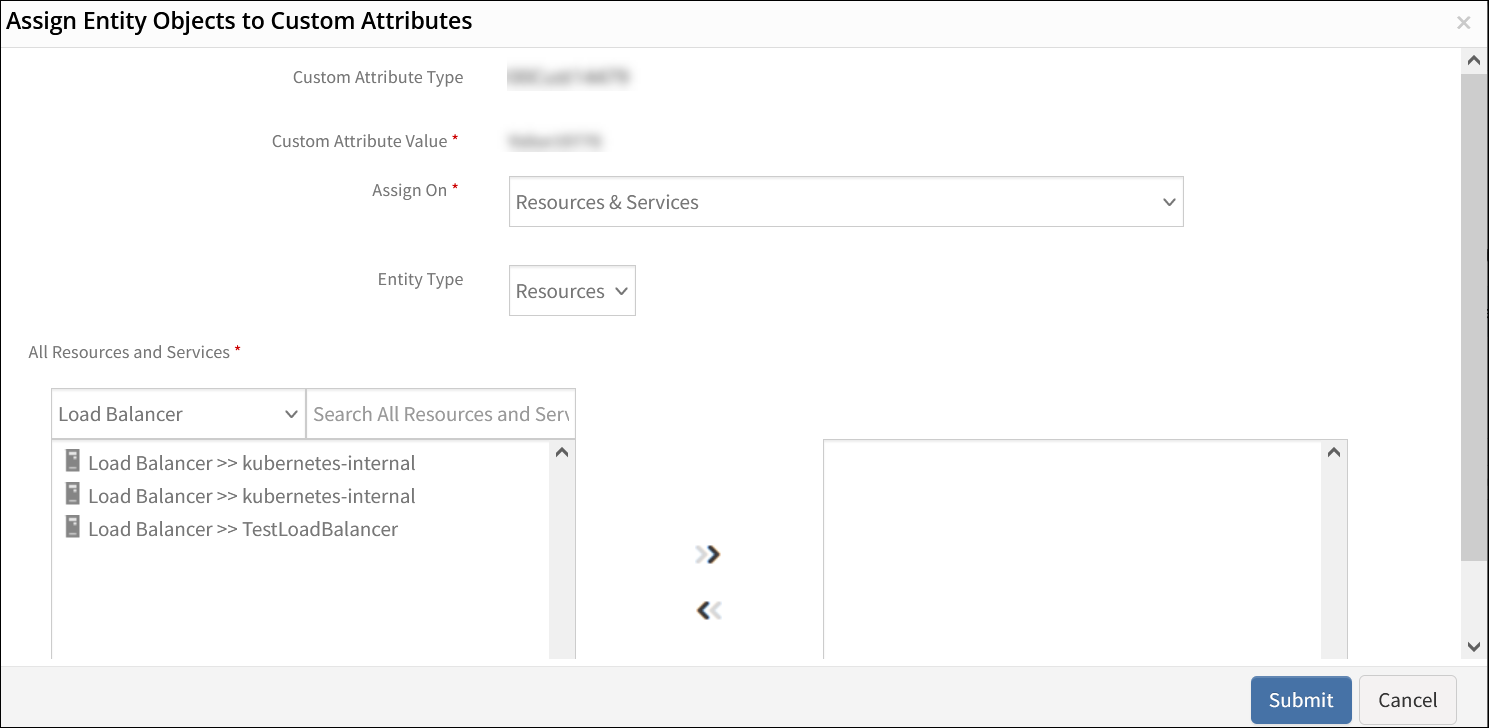
Step 3: Assign resources to the custom attributes
From the Custom Attributes screen, select the custom attribute value (use the search box to search for the custom attribute value) and click the Assign Entity Objects icon.
From the Assign Entity Objects to Custom Attributes dialog box, enter:
Custom Attribute Type: Auto-generated
Custom Attribute Value: Auto-generated
Assign On: Default is Resources & Services.
Entity type: Select either Resources or Services.
From All Resources and Services, select or search for a specific resource or service and click the right arrow icon. The selected resources appear in the other box.
Click Submit.
The custom attribute is displayed with the details.
Step 4: Configure integration
Click All Clients, select a client.
Click Setup > Account.
Select the Integrations tile.
The Installed Integrations screen is displayed, with all the installed applications.
If you do not have any installed applications, you will be navigated to the Available Integrations page. The Available Integrations page displays all the available applications along with the newly created application with the version. Note: Search for the application using the search option available. Alternatively, use the All Categories option to search.
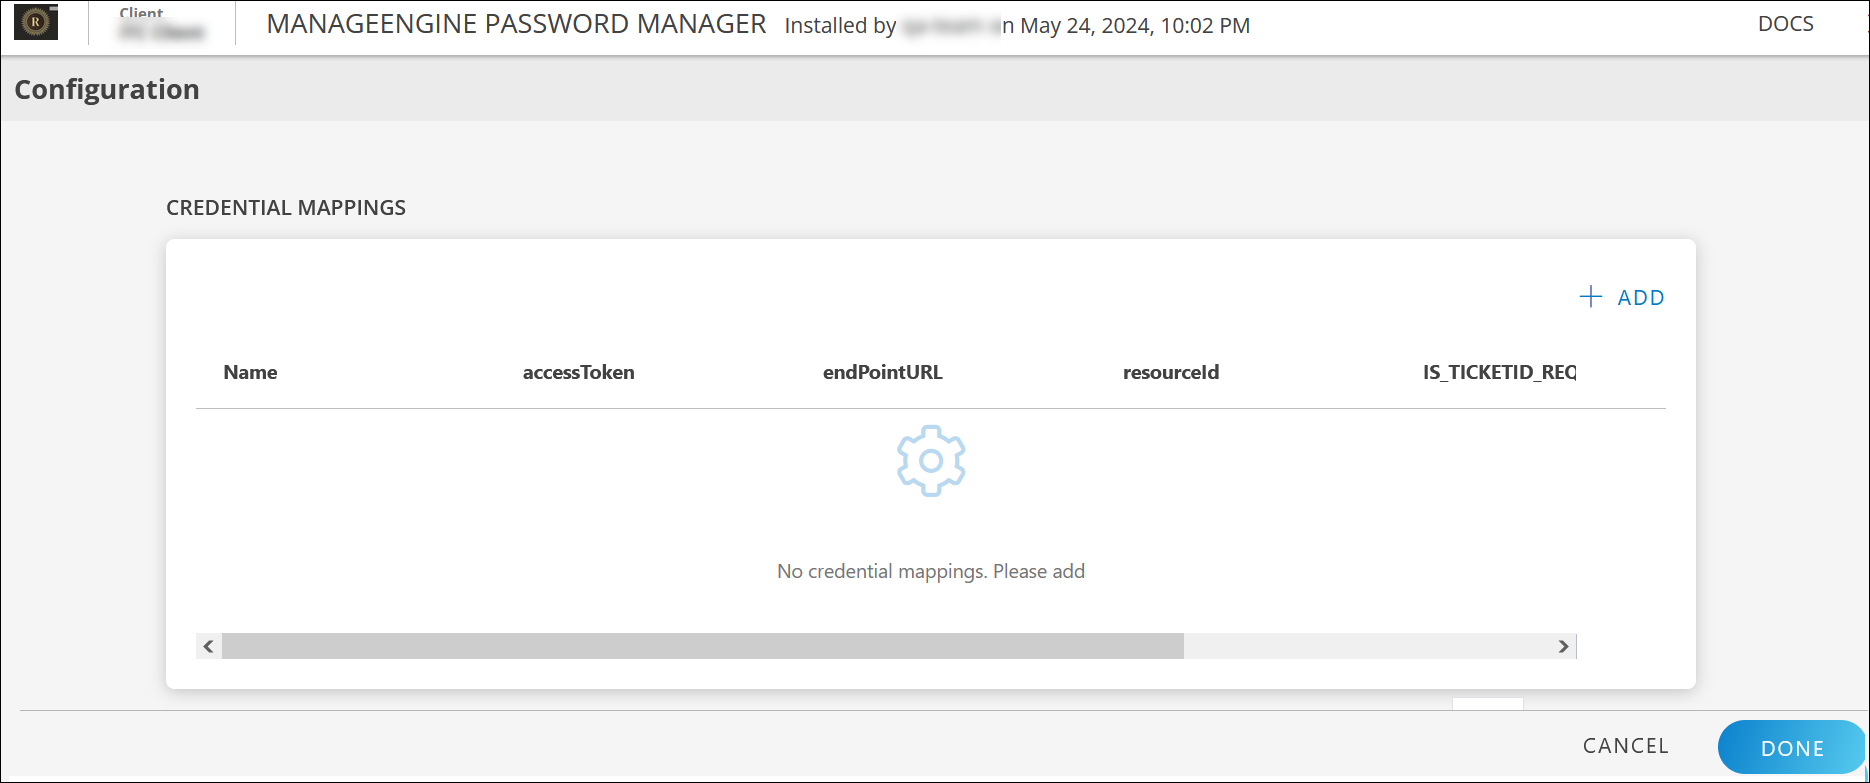
Click ADD on the ManageEngine Password Manager tile.On the Configuration screen, add credential mappings.
Click +Add in the Credential Mappings section.
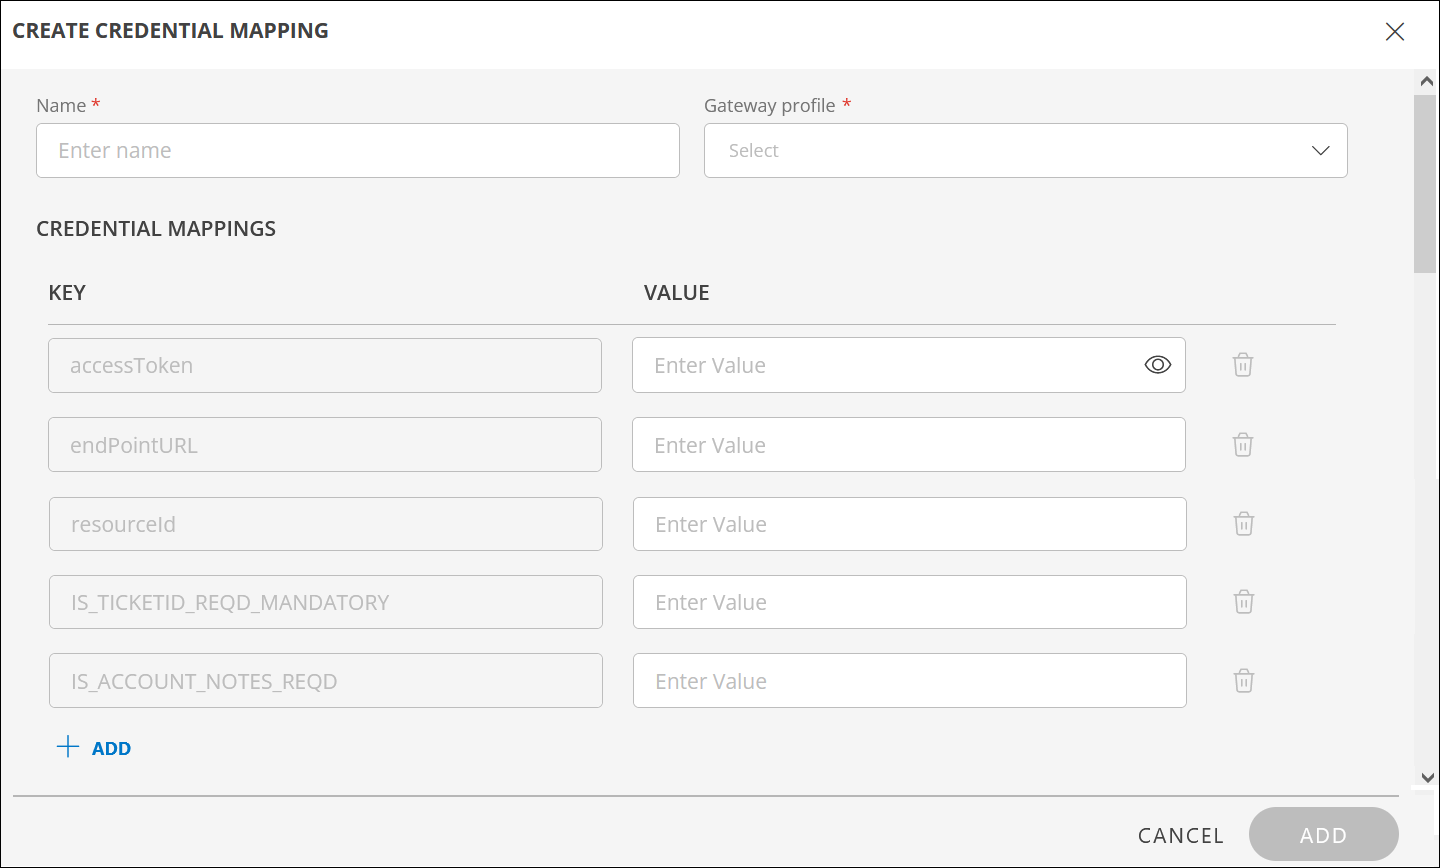
Enter the following information in the CREATE CREDENTIAL MAPPING window:
Field Name
Description
Name
Enter the password vault.
Gateway profile
Select a gateway profile from the dropdown.
Credential Mappings: Enter the values for the respective keys and click Save.
Field Name
Description
accessToken
Enter authToken copied from MPM API user creation step.
endPointURL
Enter the API endpoint URL to get password from MPM.
resourceId
Enter the custom attribute. The resource ID is stored in client level custom attributes.
IS_TICKETID_REQD_MANDATORY
IS_TICKETID_REQD_MANDATORY: TRUE if the ticket ID is required while retrieving a password, otherwise, FALSE. For more information, see
FAQs.
IS_ACCOUNT_NOTES_REQD
TRUE if account notes are required while retrieving a password, otherwise, FALSE.
The account note values are configured with the Account details and Resource details. For more information, see
FAQs.
Click Add. The configuration is created.
Click the three dots icon to Edit and remove the password vaults respectively.
Click Done.
Actions on Integration
You can perform actions like View Logs, Export, Edit, Uninstall on the integration.
When configuring MPM, create a user account for every user who will use the MPM API. Attach a single endpoint URL for each user to uniquely identify each user account. For example, user@hostname.
Log into ManageEngine Password Manager Pro.
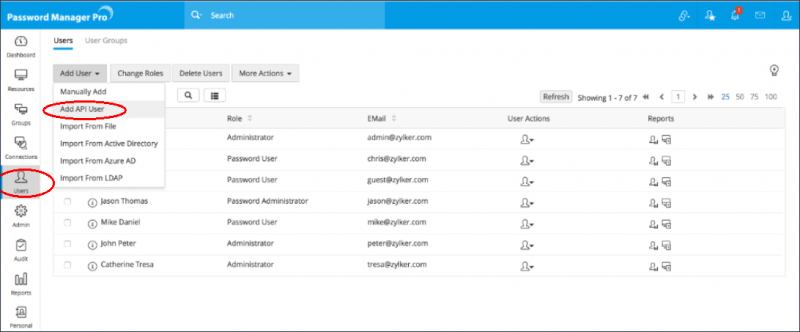
From the left pane, click Users.
From the Add User drop-down list, click Add API User.
Enter a unique login name.
Enter the name of the gateway from which the API user accesses MPM for password management operations.
Enter a unique Full Name of user. The user is identified with this name externally where the user activities such as reports, audit trails are traced.
Select the appropriate access level for the user. Supported access levels: Administrator, Password Administrator, Privileged Administrator, Password User, Custom Roles
Select one of the following options for Access Scope.
Select All Passwords in the system to change an Administrator, Password Administrator, or Privileged Administrator to a Super Administrator. With this scope, the user can access all passwords in MPM without any restriction.
Select Passwords Owned and Shared to revert the role of Super Administrator to Administrator or Password Administrator or Privileged Administrator. With this scope, user can access only self-created and shared passwords. Do NOT configure the Public key for SSH CLI access and SSL Certificate for XML-RPC API access fields.
Select Enable Now for REST API.
Click Generate for an API key. The API key is the authentication token for your access.
Copy and store the key in a secure location for your future reference. This key is required as an accessToken for configuration.
Note that the API key in the user interface is displayed only once. If you lose the key, you need to regenerate a new key.
Set a validity period for the API key. Select Never Expires if you want the key to be valid forever or select Expires On and set a date to provide a certain validity period for the key.
Enter Department and Location names and click Save.
The API user account is created in ManageEngine Password Manager Pro. When you launch a remote console, the password is retrieved through the gateway.
After the password is received, regular process of launching remote console is achieved.
Workflow for ManageEngine usage
The following is the process flow for how ManageEngine is used.
Launch the remote console.
A command is sent to the gateway to get all accounts of resources.
The user account is displayed on the console.
Based on the selected account, a command is sent to the gateway to get the password.
After the password is received, the remote console launch is completed.
FAQs
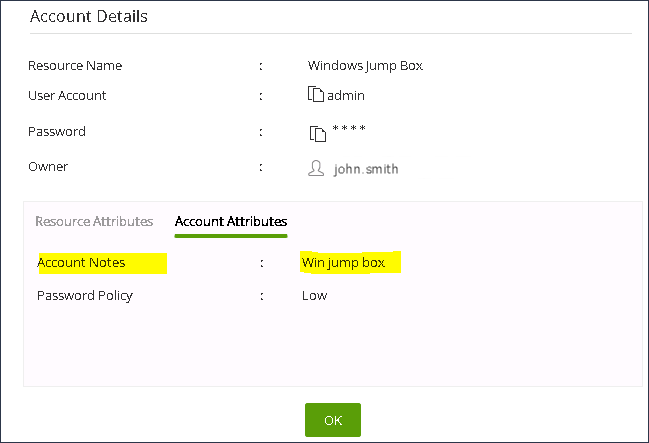
What is the IS_ACCOUNT_NOTES_REQD field in the configuration Properties section?
In MPM, a few attributes are associated with Account and a few attributes are associated with Resource. Account Notes is an account attribute that can be used to specify more information for Account Type or Resource Type while fetching password from MPM. This information is used to identify the resource or account.
If IS_ACCOUNT_NOTES_REQD is set as true, the notes information is displayed including the account name. For example, after installing MPM and setting IS_ACCOUNT_NOTES_REQD as true, the resource name (Windows_Jump_Box) is displayed including user name admin in accounts list.
What is IS_TICKETID_REQD_MANDATORY field in configuration Parameters section?
If IS_TICKETID_REQD_MANDATORY is set as true, the Ticket Id field is displayed in the launch console pop-up window. This Ticket Id provided in the launch console pop-up window can be used as a reference to know the purpose for fetching an account or password.