Introduction
Scheduled Maintenance is a set time period during which specific resources in your IT environment undergo maintenance activities.
These activities might include:
- Software updates
- Security patches
- Hardware upgrades
- Database maintenance
- Backup and disaster recovery.
Scheduled Maintenance is essential to minimize downtime and disruptions to business operations, while enhancing the security and efficiency of your infrastructure. It is vital for optimal utilization, availability, and performance of your IT assets.
Create and manage scheduled maintenance on the managed resources in your IT environment.
Following are the actions you can perform on a scheduled maintenance:
- Create - Create a scheduled maintenance.
- View - View the scheduled maintenance details.
- Edit - Edit pending scheduled maintenance.
- Create Copy - Create a copy of an existing scheduled maintenance.
- Suspend - Suspend active scheduled maintenance.
- End - End an active scheduled maintenance window.
- Resume - Resume suspended maintenance window.
- Remove - Remove a pending or completed maintenance window.
Permissions
Following are the permissions required to perform various actions:
| Category | Permission Type | Permission Value | User action |
|---|---|---|---|
| Account Administration | Devices | View | To create and perform all actions on scheduled maintenance. |
| Scheduled Maintenance | Manage | ||
| Account Administration | Devices | View | To view scheduled maintenance details. |
| Scheduled Maintenance | View |
Note:
If user has Scheduled Maintenance View and Devices View permission:
- They can view the maintenance listing page and also the list of resources added to the maintenance.
- If user has Devices View permission to only a set of resources, they can view resource details only for that set of resources.
Example: There are 10 resources in total. The user has Devices View permission for only 5 of them. As a result, they can see all 10 resources on the maintenance listing page, but can view detailed information for only those 5 resources.
To modify a Scheduled Maintenance, the user should have Scheduled Maintenance Manage and Devices View permissions for all resources in the maintenance. They cannot modify the maintenance, even if there is no access to a single resource or a group.
Example: If user has Scheduled Maintenance Manage and Devices View permission to only 2 out of 5 resources in a maintenance, they can view all the 5 resources in the maintenance listing page, but cannot modify the maintenance.
Note
- This feature is available only at the client level.
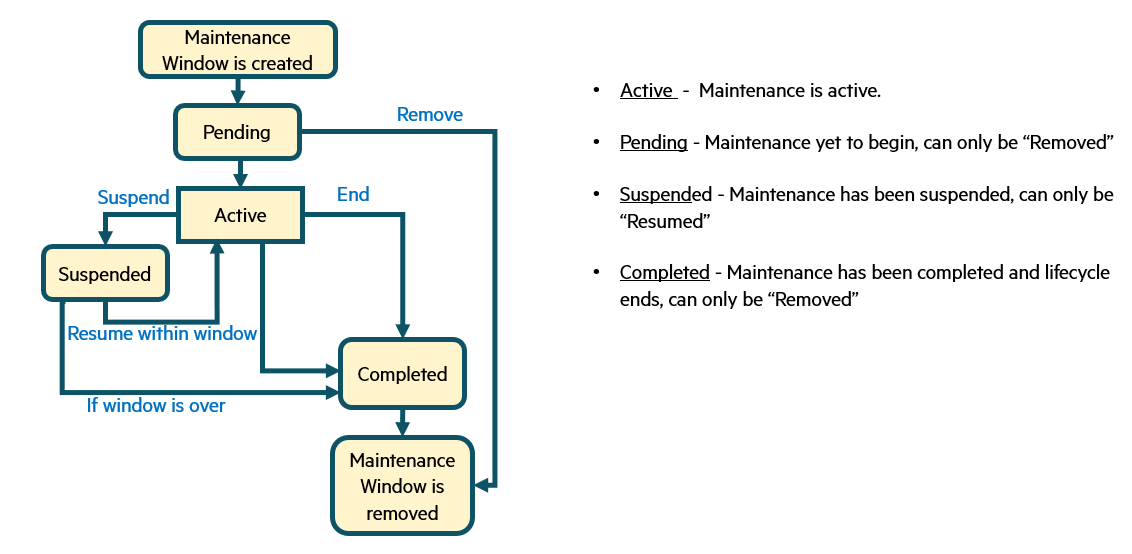
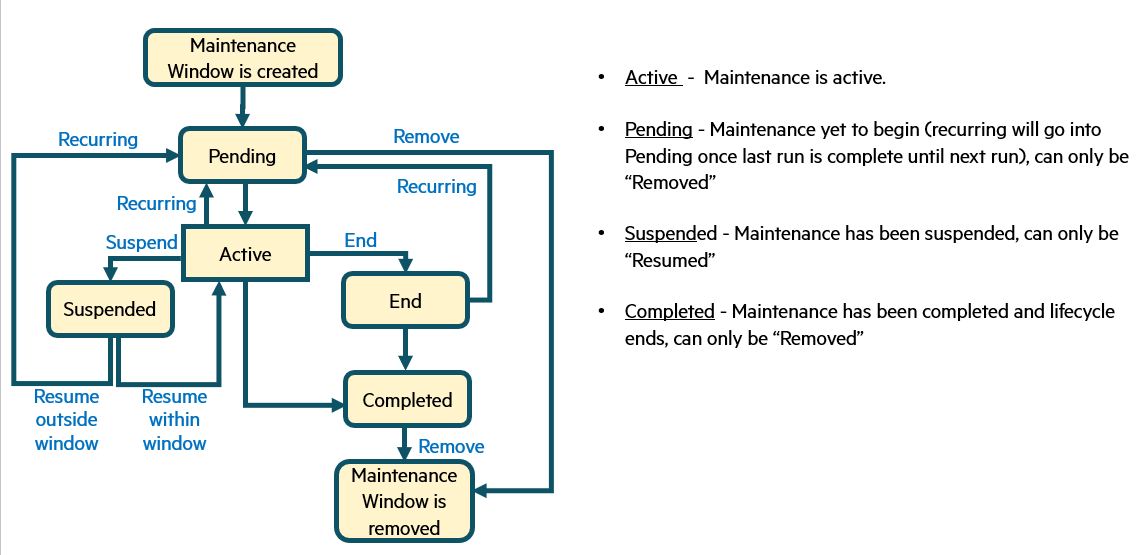
Maintenance Window Status Workflow
This workflow illustrates the status transitions a maintenance window can go through — from creation to removal. It covers both one-time and recurring maintenance windows and defines how they move between states such as Pending, Active, Suspended, Completed, and Removed.
Each status is defined with its conditions and possible transitions, enabling clear visibility into the maintenance lifecycle.
One-Time Maintenance Window Workflow:
Recurring Maintenance Window Workflow:
Create a scheduled maintenance
Follow these steps to create a scheduled maintenance:
Navigate to Setup → Account. The ACCOUNT DETAILS screen is displayed.
Click Scheduled Maintenance tile. The SCHEDULED MAINTENANCE listing screen is displayed.
Click +ADD. The ADD SCHEDULED MAINTENANCE screen is displayed.

Enter the following information:

ASSIGNED RESOURCES
Field Name Field Type Description Select one of the options:
All Resources or Selected ResourcesRadiobutton All Resources: Select this option if you want to assign all the resources in the client.
Selected Resources : Select this option if you want to manually assign resources. Scheduled maintenance will be created for all the selected resources.
You can use any of the options - Manually Assigned Resources, Resource Groups, or Sites, or a combination of them.Manually Assigned Resources (0/100) Dropdown Select the resources from the dropdown. You can also use the ADVANCED SEARCH link to select resources: - Click ADVANCED SEARCH and click +QUERY and build a query.
- Select the resources and click APPLY SELECTION.
- A maximum of 100 resources can be selected.
- You should have access to All Resources to add resources.
Resource Groups (0/50) Dropdown Select resource group(s) from the dropdown.
Note:- A maximum of 50 groups can be selected.
- You should have access to All Resources to add resource group(s).
Sites (0/50) Dropdown Select site(s) from the dropdown.
Note:- A maximum of 50 site can be selected.
- You should have access to All Resources to add site(s).
MAINTENANCE WINDOW DETAILS
Field Name Field Type Description Name String Enter a scheduled maintenance name. Description String Enter the reason for the maintenance. Schedule Selection Select the required schedule recurrence and enter the details: - ONE TIME
This is a single occurrence maintenance.- Select the start date, time, and time zone, as well as the end date, time, and time zone.
The maintenance will be triggered based on the specified schedule.
Example: Start Time = 9:00 am
Start Date = 15/01/2025
End Time = 10:00 am
End Date = 15/01/2025
The maintenance will be applied for the specified duration, i.e., 9:00 am to
10:00 am on 15/01/2025, in the selected time zone.
- Select the start date, time, and time zone, as well as the end date, time, and time zone.
- DAILY
This is a recurring pattern.- Select the number of days to specify frequency of the occurrence.
- Select the Start Time, End Time, Time Zone, as well as the start date.
Toggle End Date to enable or disable the end date for the schedule. If you disable End Date, the schedule will have no end date and will continue indefinitely.
Example:- Every 1 day(s) → it will trigger every day
- Every 2 day(s) → it will trigger on days 1, 3, 5, 7, 9, 11, and so on. The same sequence will start again next month from day 1.
- Every 3 day(s) → it will trigger days 1, 4, 7, 10, 13, 16, and so on. The same sequence will start again next month from day 1. If you select the start date as 11/01/2025, maintenance will trigger on days 13, 16, 19, 22, 25, and so on. The same sequence will start again next month from day 1.
- WEEKLY
This is a recurring pattern.- Select the days of the week on which the maintenance should repeat. The selected days will be highlighted.
- Select the Start Time, End Time, and Time Zone as well as the start date.
Toggle End Date to enable or disable the end date for the schedule. If you disable End Date, the schedule will have no end date and will continue indefinitely.
Example: If you select Tuesday, Thursday, and Saturday, and
Start Time = 9:00 am
End Time = 10:00 am
Start Date = 15/01/2025
End Date = 15/10/2025
The maintenance will trigger every Tuesday, Thursday, and Saturday from 9:00 am to 10:00 am from 15/01/2025 to 15/10/2025.- MONTHLY This is a recurring pattern.
- Select the specific day of the month for the recurrence using the dropdown.
- Select the Start Time, End Time, and Time Zone, as well as the start date.
Toggle End Date to enable or disable the end date for the schedule. If you disable End Date, the schedule will have no end date and will continue indefinitely.
Example: If you select on First Monday, at 10:00 am to 11:00 am, starting 01/03/2025, then the maintenance will trigger on the First Monday, i.e. on March 3rd, then on April 7th, May 5th, and so on, from 10:00 to 11:00 am starting 01/03/2025.- YEARLY
This is a recurring pattern.- Select the specific month(s) to specify frequency of the occurrence.
- Select the occurrence within the selected month(s).
- Select the Start Time, End Time, and Time Zone.
Select the start date and end date. Toggle End Date to enable or disable the end date for the schedule. If you disable End Date, the schedule will have no end date and will continue indefinitely.
- Example 1: If you select every January, March, April, May, on 1st, 7th, 8th, at 10:00 am to 11:00 am, starting 01/01/2025, then the maintenance will trigger on 1st, 7th, and 8th of January, March, April, and May, every year from 10:00 to 11:00 am starting 01/01/2025.
- Example 2: Fourth Wednesday of August and September every year from 10:00 to 11:00 am starting 01/01/2025.
Settings Checkbox Select the required option(s): - Run RBA scripts during this window: The system will run RBA scripts during the maintenance period.
- Install patches during this window: The system will install patches during the maintenance period.
- Correlate all open alerts when window ends: All the open critical and warning alerts will be correlated when the maintenance period ends.
- Escalate maintenance alerts when window ends: All the maintenance alerts will be escalated when the maintenance period ends.
- Define alert criteria to classify an alert as a maintenance alert:
- Click ANY or ALL to match any one or all of the conditions you define for filtering.
- Enter information for the filter criteria in the following fields:
- Property: Select the required attribute.
- Operator: Select the operator.
- Value: Select or enter the value accordingly.
- Click +ADD to add more conditions.
- Click the delete icon to delete a condition.
- Alerts that meet the conditions given in the Filter Criteria will be triggered as Scheduled Maintenance alerts.
- Alerts that do not meet the conditions given in the Filter Criteria will be triggered as Monitoring alerts.
NOTIFICATION SETTINGS: These settings enable you to add users and user groups to receive notifications when the maintenance window is created, updated, suspended, resumed, ended, or deleted. All recipients will be informed of these changes accordingly.
You can configure additional notifications to alert users a specified time before the scheduled maintenance starts and ends.Field Name Field Type Description Users Dropdown Select one or more users from the dropdown. User Groups Dropdown Select one or more user groups from the dropdown. ADDITIONAL NOTIFICATIONS - Before maintenance starts
Spinner/Dropdown Use the spinner and the dropdown to define the time duration.
Example: If you set the time duration as 1 hour(s) Before maintenance starts, then the users will receive Email notification 1 hour before the scheduled maintenance starts.
Note: This applies only for maintenance windows having status Pending.- Before maintenance ends
Spinner/Dropdown Use the spinner and the dropdown to define the time duration.
Example: If you set the time duration as 1 day(s) Before maintenance ends, then the users will receive Email notification 1 day before the scheduled maintenance ends.
Note: This applies only for maintenance windows having status Active.Note: Specify the time interval within the following limits: - Minute(s): 1 - 60
- Hour(s): 1 - 24
- Day(s): 1 - 7
Click ADD MAINTENANCE WINDOW. The Scheduled Maintenance is created and displayed on the SCHEDULED MAINTENANCE listing screen.
Use the search box to search for the newly created Scheduled Maintenance.
Note: During scheduled maintenance, the system will still generate alerts when issues occur. It will not escalate or correlate alerts, even if specified in the scheduled maintenance configuration; it will escalate or correlate once the maintenance window is completed.
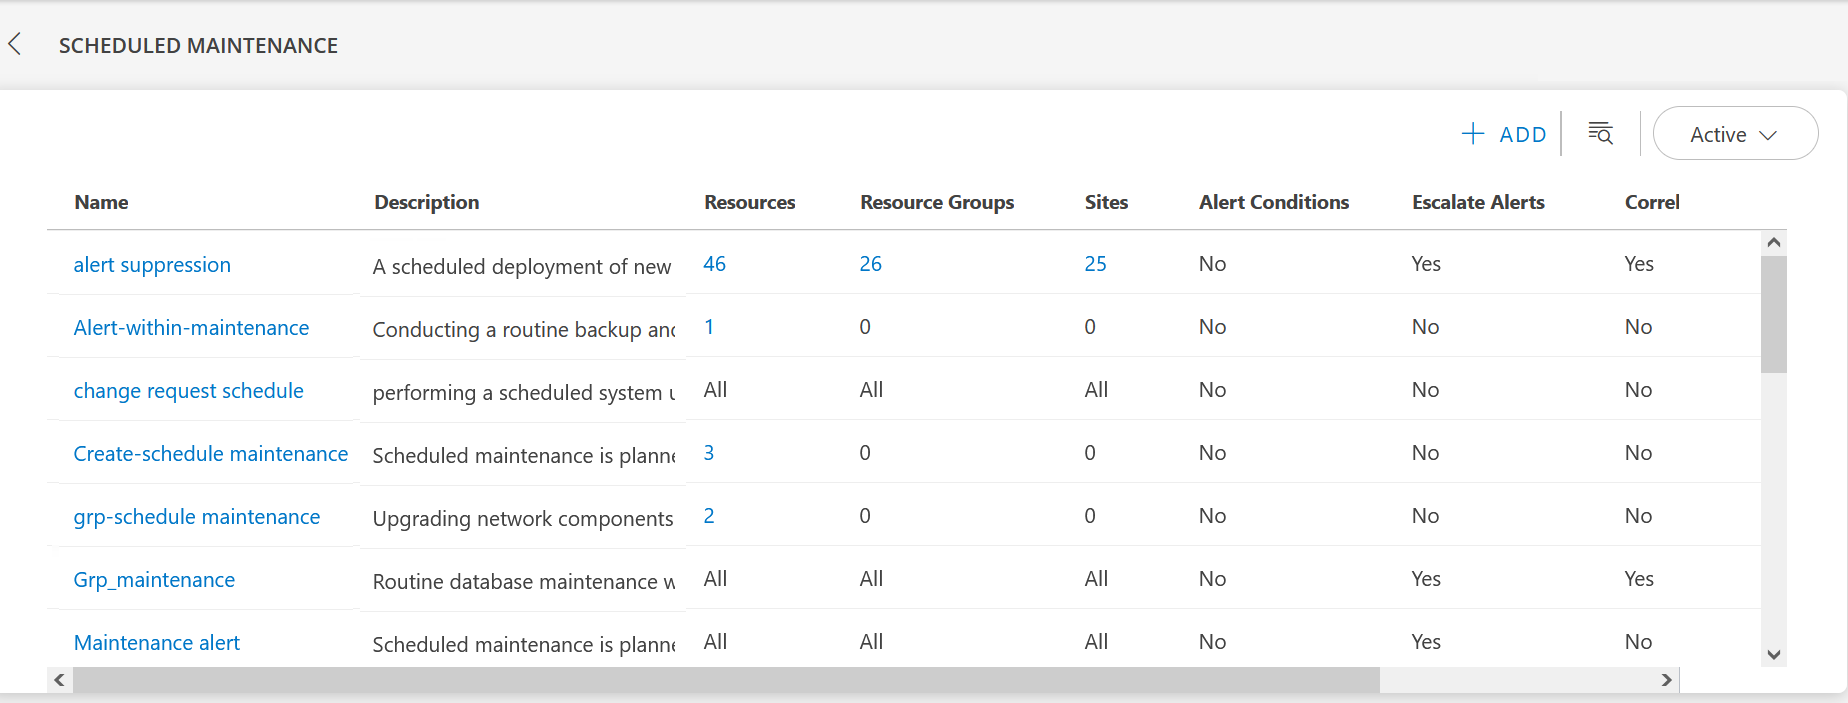
The Scheduled Maintenance listing screen displays the following information:
| Column Name | Description |
|---|---|
| Name | Scheduled Maintenance name. |
| Description | Description of the Scheduled Maintenance. Displays a clock tooltip. Hover over the tooltip to view the schedule information. |
| Resources | Number of resources assigned to the scheduled maintenance. Click on the number to view the details. |
| Resource Groups | Number of resource groups assigned to the scheduled maintenance. Click on number to view the details. |
| Sites | Number of sites assigned to the scheduled maintenance. Click on the number to view the details. |
| Alert Conditions | Yes: Alert conditions are defined. Alerts are triggered based on the filter criteria. No: No alert conditions are defined, so no alerts are triggered. |
| Escalate Alerts | Yes if the option to escalate maintenance alerts when window ends is selected during the schedule maintenance creation process. |
| Correlate Alerts | Yes if the option to Correlate all open alerts when window ends is selected during the schedule maintenance creation process. |
| Status | Displays the Maintenance window status: Active, Pending, Suspended, or Completed. |
Manage scheduled maintenance
Follow these steps to navigate to the MAINTENANCE WINDOW listing screen:
Click Setup → Account.
From Account Details screen, click Maintenance windows. The MAINTENANCE WINDOW listing screen is displayed.
You can perform the following actions:
| Action | Description |
|---|---|
| View Details | To view scheduled maintenance details:
|
| Create Copy | To create a copy:
|
| Edit | Note: You can edit only pending scheduled maintenance. To edit:
|
| Filter | You can filter scheduled maintenance based on their status. To filter:
Next 1 day, Next 2 days, Next 7 days, and All Future. To view:
|
| Suspend | You can suspend an active scheduled maintenance. To suspend:
To bulk suspend maintenance windows:
|
| End | You can end an active scheduled maintenance. To end:
To bulk end maintenance windows:
|
| Resume | You can resume a suspended maintenance window. To resume:
To bulk resume maintenance windows:
|
| Remove | You can remove a pending or completed maintenance window. Note: Once removed, the maintenance record(s) cannot be reverted. To remove:
To bulk remove maintenance windows:
|