Introduction
OpsRamp provides a set of configurable options that allow you to manage key aspects of your account. These include updating personal details, setting up notifications, and customizing browser behavior for an optimized experience.
Managing your Profile
The following sections explain these tabs in detail:
- Profile Details
Update your basic personal information such as name, email, phone number, preferred homepage, and time format. - Notifications
Set your preferences for receiving alerts and updates related to system activity, login events, and other important information. - Browser Console
Adjust browser console settings to improve interface responsiveness and tailor performance to your needs.
Profile Details
The PROFILE DETAILS screen allows you to:
- View and update User Details
- View and update Options
Follow these steps to access MY PROFILE screen:
Log in to OpsRamp.
Hover the mouse over your avatar in the top-right corner of the screen and click My profile.

Note: SSO users can view the OpsRamp release version along with the patch level.
Provide the following information:

PROFILE DETAILS
Field Name Field Type Description First Name String Your First name. Last Name String Your Last name. User Name String The user name specified during account setup. This is automatically populated. Primary Email String Your primary email address for receiving notifications. Country Dropdown Your country Phone Number Integer Select a country from the dropdown.
Enter your phone number.
Example:+11234567890Mobile Integer Select a country from the dropdown.
Enter your mobile number.
Example:+11234567890
Follow these steps to verify your mobile number:- Enter your mobile number and save the profile. The VERIFY link is enabled.
- Click the link and enter the OTP received on your mobile.
- Click VERIFY. The verification is complete. An error message appears, if mobile number is incorrect.
Alternate Email String An alternate email address, which you can associate with notifications. Profile Picture File Input Click Upload and upload your profile picture. After uploading, the picture is visible under Current Picture.
Supported file format: PNG, JPG. Recommended size is up to 512 X 512 px.WORK HOURS: Use the Work Hours setting to define the working days and time range for the schedule.
- Day: Select the days of the week for which the work hours apply. Multiple days can be selected as required.
- From: Specify the start time of the work hours.
- To: Specify the end time of the work hours.
OPTIONS
Field Name Field Type Description Apply User Time Settings Checkbox If you select this option, all dates and times across the platform will follow your selected time zone, date pattern, and time format preferences. Time Zone Dropdown Your local time zone. Date Patterns Dropdown Your preferred date display format. Example: MM/dd/yy,yyyy/dd/MM.Time Format Radio button Your preferred time display format. Select from a 12-hour or 24-hour clock. Home Page Dropdown You can set a preferred landing page based on your user profile settings. Select an option from the dropdown list. Theme Mode Radio button Your preferred theme, you may either select Light mode or Dark Mode.
Note: Dark Mode may not apply across the entire OpsRamp portal.Default Partner Dropdown Select default partner from the dropdown. After successful login to OpsRamp, you will see this partner, in the Partner/Client dropdown, selected by default. Default Client Dropdown Based on the partner selected, the list of clients are displayed in Default Client dropdown.
Select default client from the dropdown.
After successful login to OpsRamp, you will see this client, in the Partner/Client dropdown, selected by default.
Notifications
You can manage and choose the notifications you want to receive. Choose either Primary or Alternate Email, or both, for notification purposes. You will be notified on Account, Alert, Report, Export, or Login Activity related information.
From MY PROFILE screen, click NOTIFICATIONS tab.
Provide the following information:
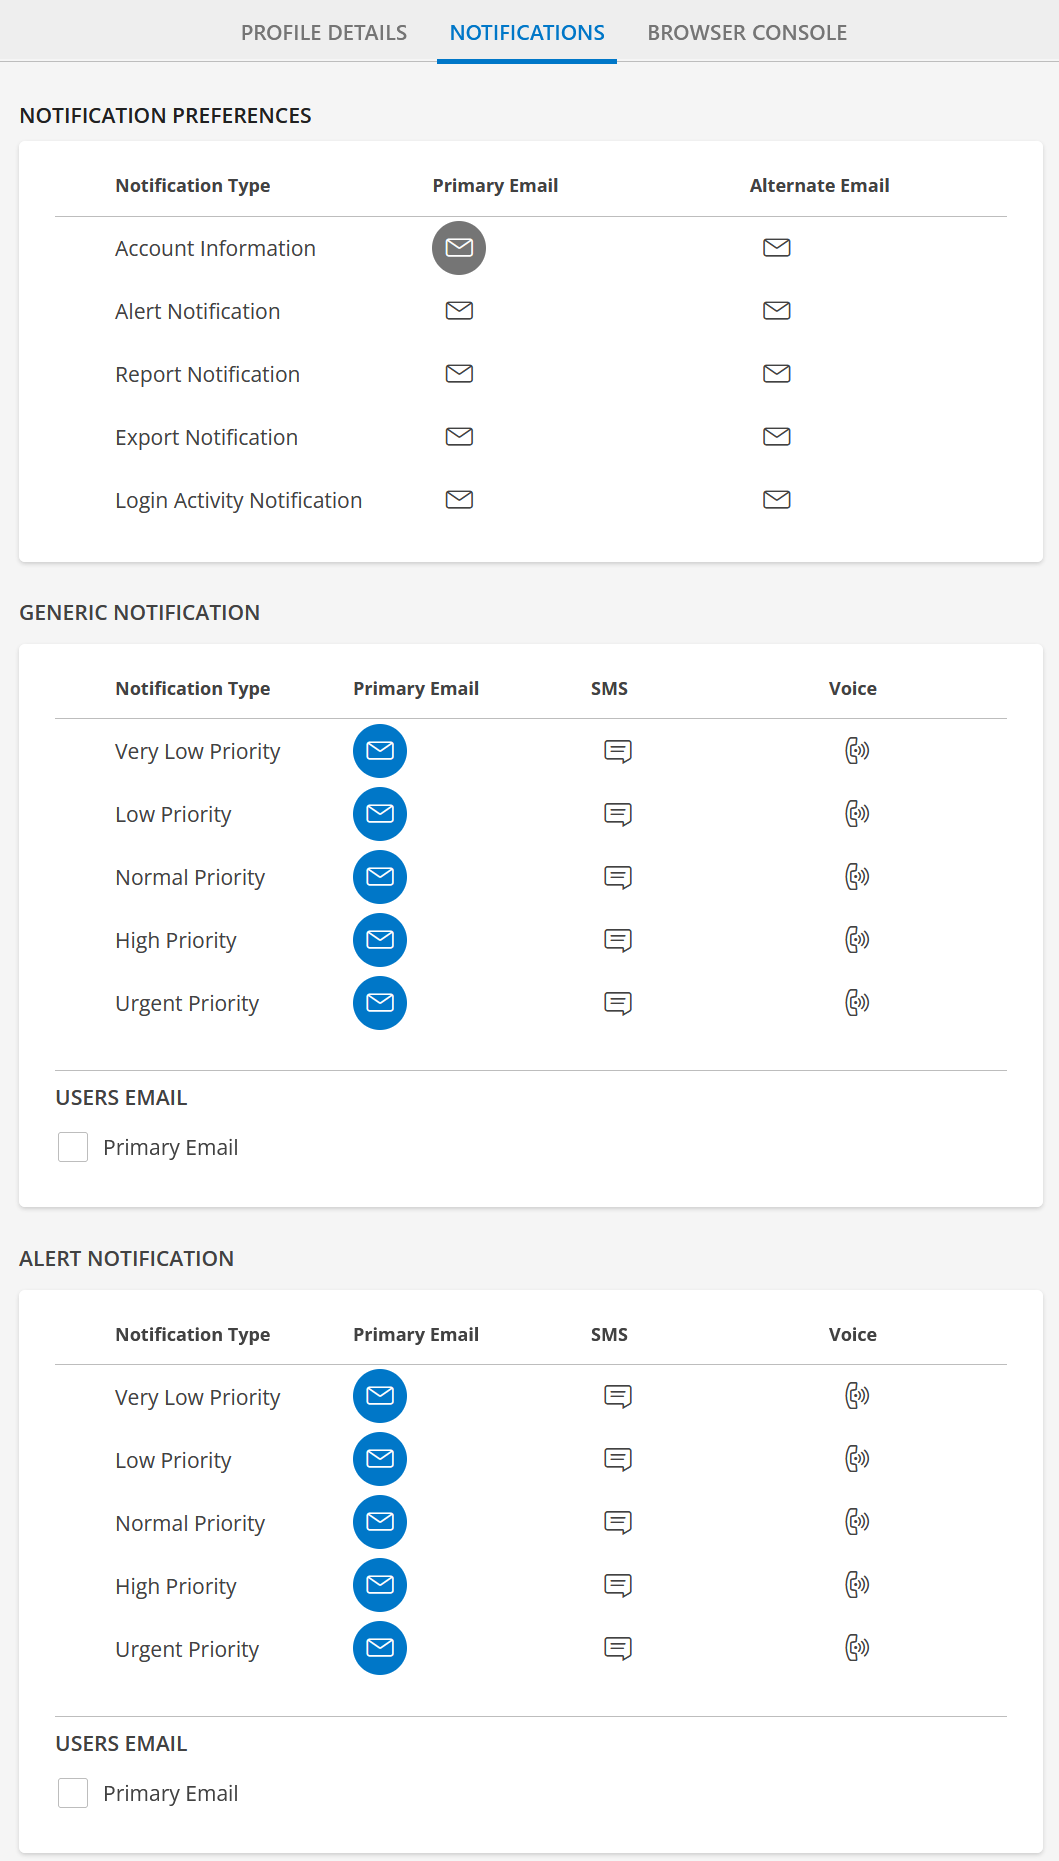
NOTIFICATION PREFERENCES
Field Name Field Type Description Notification Type Selection Account Information: Primary Email is selected by default.
Select Alternate Email envelope icon, if you want the notifications to be sent to your Alternate Email too.
Alert Notification: Select Primary Email or Alternate Email envelope icon, or both. Based on the selection, notifications will be sent to the corresponding Email address(es).
Report Notification: Select Primary Email or Alternate Email envelope icon, or both. Based on the selection, notifications will be sent to the corresponding Email address(es).
Note: The Report Notification option is enabled by default for new users onboarded through SSO. Export Notification: Select Primary Email or Alternate Email envelope icon, or both. Based on the selection, notifications will be sent to the corresponding Email address(es).
Login Activity Notification: Select Primary Email or Alternate Email envelope icon, or both. Based on the selection, notifications will be sent to the corresponding Email address(es).REPORT PREFERENCES: Select Send notifications for recurring reports as a single digest checkbox, if you want all the recurring reports to be compiled and sent as a single notification.
Note: This option is displayed if you select Notification Type as Report Notification.GENERIC NOTIFICATION: You can receive notifications based on priority and notification method for each priority.
Field Name Field Type Description Notification Type Selection Very Low Priority: Primary Email is selected by default. Select SMS or Voice, if you want Very Low Priority notifications to be sent as SMS/Voice to your registered mobile number.
Low Priority: Primary Email is selected by default. Select SMS or Voice, if you want Low Priority notifications to be sent as SMS/Voice to your registered mobile number.
Normal Priority: Primary Email is selected by default. Select SMS or Voice, if you want Normal Priority notifications to be sent as SMS/Voice to your registered mobile number.
High Priority: Primary Email is selected by default. Select SMS or Voice, if you want High Priority notifications to be sent as SMS/Voice to your registered mobile number.
Urgent Priority: Primary Email is selected by default. Select SMS or Voice, if you want Urgent Priority notifications to be sent as SMS/Voice to your registered mobile number.USERS EMAIL: Select Primary Email/Alternate Email checkbox if you want to receive general notifications to your primary Email address or Alternate Email address.
The Alternate Email checkbox appears if you provided an alternate email in Profile Details tab.ALERT NOTIFICATION: You can receive alert notifications based on priority and notification method for each priority.
Field Name Field Type Description Notification Type Selection Very Low Priority: Primary Email is selected by default. Select SMS or Voice, if you want Very Low Priority alert notifications to be sent as SMS/Voice to your registered mobile number.
Low Priority: Primary Email is selected by default. Select SMS or Voice, if you want Low Priority alert notifications to be sent as SMS/Voice to your registered mobile number.
Normal Priority: Primary Email is selected by default. Select SMS or Voice, if you want Normal Priority alert notifications to be sent as SMS/Voice to your registered mobile number.
High Priority: Primary Email is selected by default. Select SMS or Voice, if you want High Priority alert notifications to be sent as SMS/Voice to your registered mobile number.
Urgent Priority: Primary Email is selected by default. Select SMS or Voice, if you want Urgent Priority alert notifications to be sent as SMS/Voice to your registered mobile number.USERS EMAIL: Select Primary Email/Alternate Email checkbox if you want to receive alert notifications to your primary Email address or Alternate Email address.
The Alternate Email checkbox appears if you provided an alternate email in Profile Details tab.
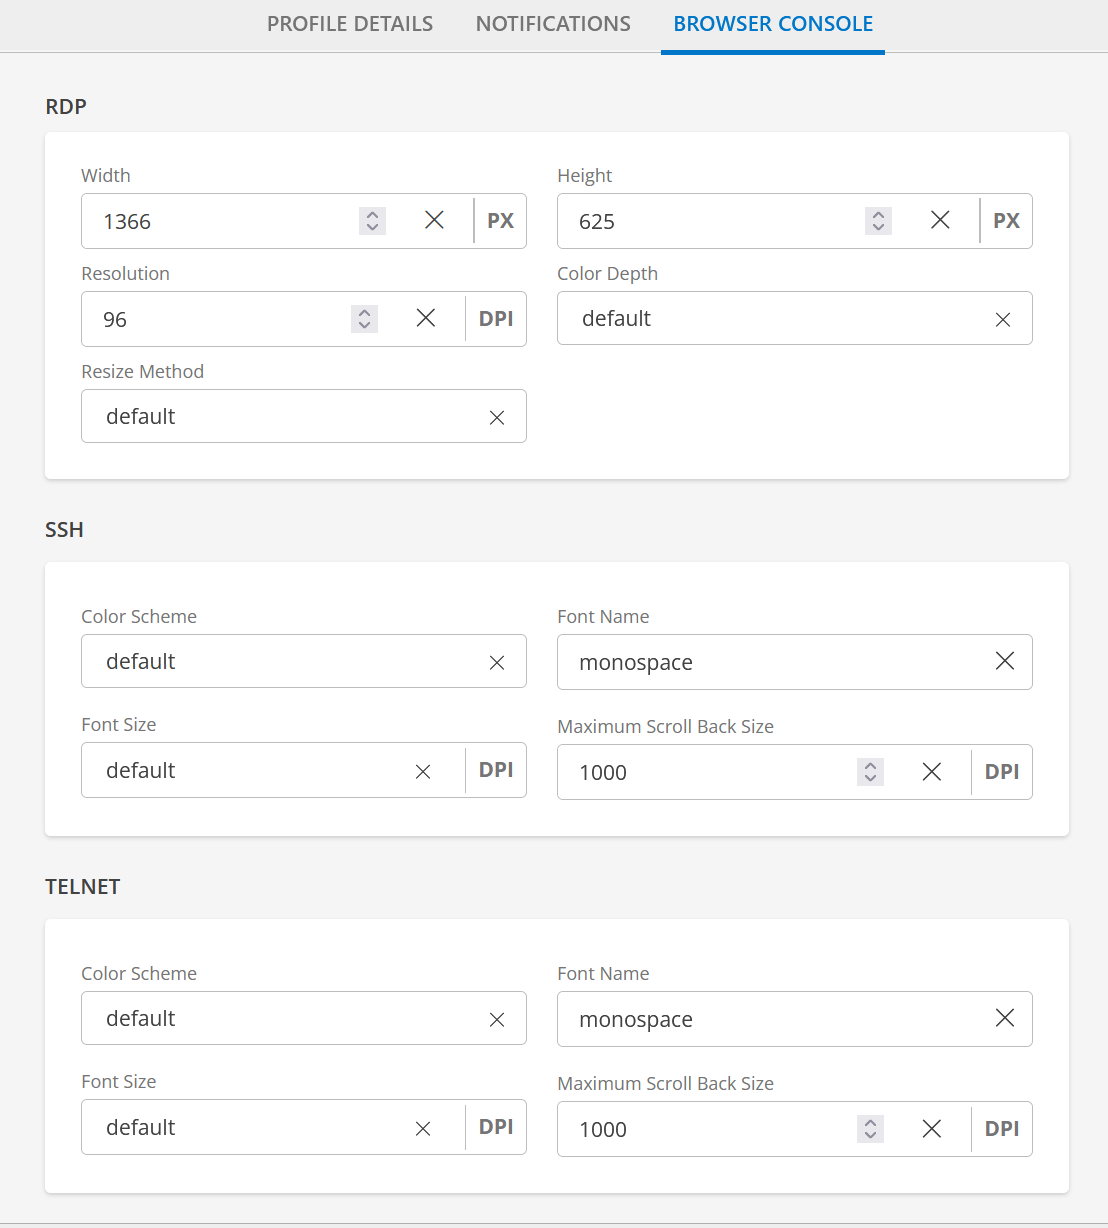
Browser Console
Use the BROWSER CONSOLE preference to specify the properties for the console types: Remote Desktop Protocol (RDP), Secure Shell (SSH) protocol, and TELNET.
From MY PROFILE screen, click BROWSER CONSOLE tab.
Provide the following information:
RDP: RDP allows you to connect to another computer over a network connection. Configure DPI settings, height, weight color depth, resize method to match your screen size.
Field Name Field Type Description Width (PX) Integer (optional) Width of the display to request, in pixels. If not specified, the default width is used.
The browser console automatically chooses the appropriate display size for RDP connections based on the browser window size and the device DPI. You can force the display size by specifying explicit width or height values.Height (PX) Integer (optional) Height of the display to request, in pixels. If not specified, the default height is used. Resolution (DPI) Integer (optional) Effective resolution you want for the client display, in DPI. If not specified, the default resolution is used for the RDP session. Color Depth Dropdown (optional) Color depth to request, in bits-per-pixel. If specified, this must be 8, 16, or 24. Regardless of the value you specify, if an update uses less than 256 colors, the browser console always sends the update as a 256-color PNG image.
To reduce bandwidth usage, consider reducing color depth. The browser console automatically detects 256-color images, which can be guaranteed for all graphics sent over the connection by forcing the color depth to 8-bit. Otherwise, color depth is dictated by the RDP server.Resize Method Dropdown (optional) Method to use to update the RDP server when the width or height of the client display changes. If not specified, the default method is considered. Options: - display-update uses the RDP 8.1+ Display Update channel to signal the server when the client display size changes.
- reconnect automatically disconnects the RDP session when the client display size changes and reconnects with the new size.
SSH: SSH support provides a display, but not an RDP-like protocol. The display is a terminal emulator, and that has options for configuring text properties. The specified font must be installed on the server because the server, not the client, renders the characters to the display terminal.
Field Name Field Type Description Color Scheme Dropdown (optional) The color scheme of the terminal emulator used for SSH connections. The color scheme is specified as semicolon-separated name-value pairs. Each name-value pair assigns a value to a color in the terminal emulator palette.
Example of default blue text on a white background and the red color represented as a purple shade:foreground: rgb:00/00/ff; background: rgb:ff/ff/ff; color9: rgb:80/00/80
This format is similar to the color configuration format used by Xterm. Xterm color configurations can be adapted to the browser console. If not specified, the browser console renders text as gray on a black background. Possible color names are:foregroundsets the default foreground colorbackgroundsets the default background colorcolorsets the color at index on the Xterm 256-color palette. For example,color9refers to the red color. Possible color values are:rgb:RR/GG/BBUse the specified color in RGB format, with each component in hexadecimal notation. For example,rgb:ff/00/00specifies the color red. Each hexadecimal component can be one to four digits. The effective values are always zero-extended or truncated to two digits. For example,rgb:f/8/0,rgb:f0/80/00, andrgb:f0f/808/00fall refer to the same effective color.colorUse the color currently assigned to index on the Xterm 256-color palette. For example,color9specifies the current red color. Note that the color value is used rather than the color reference. Ifcolor9is changed in the color scheme configuration, the new color is not reflected in this assignment.
black-whiteBlack text over a white backgroundgray-blackGray text over a black background, the default color schemegreen-blackGreen text over a black backgroundwhite-blackWhite text over a black background
Font Name String (optional) The font name. If not specified, the default font is monospace.Font Size (DPI) Dropdown (optional) The font size, in points. If not specified, the default font size is 12. Maximum Scroll Back Size (DPI) Combo box (optional) Maximum number of rows to permit within the terminal scrollback buffer. If not specified, the scrollback buffer is limited to a maximum of 1000 rows. TELNET: Telnet support provides a display, but not an RDP-like protocol. The display is a terminal emulator, and that has options for configuring text properties. The specified font must be installed on the server because the server, not the client, renders the characters to the display terminal.
Field Name Field Type Description Color Scheme Dropdown (optional) The color scheme of the terminal emulator used for Telnet connections. The color scheme is specified as semicolon-separated name-value pairs. Each name-value pair assigns a value to a color in the terminal emulator palette.
Example of default blue text on a white background and the red color represented as a purple shade:foreground: rgb:00/00/ff; background: rgb:ff/ff/ff; color9: rgb:80/00/80
This format is similar to the color configuration format used by Xterm. Xterm color configurations can be adapted to the browser console. If not specified, the browser console renders text as gray on a black background. Possible color names are:foregroundsets the default foreground colorbackgroundsets the default background colorcolorsets the color at index on the Xterm 256-color palette. For example,color9refers to the red color. Possible color values are:rgb:RR/GG/BBUse the specified color in RGB format, with each component in hexadecimal notation. For example,rgb:ff/00/00specifies the color red. Each hexadecimal component can be one to four digits. The effective values are always zero-extended or truncated to two digits. For example,rgb:f/8/0,rgb:f0/80/00, andrgb:f0f/808/00fall refer to the same effective color.colorUse the color currently assigned to index on the Xterm 256-color palette. For example,color9specifies the current red color. Note that the color value is used rather than the color reference. Ifcolor9is changed in the color scheme configuration, the new color is not reflected in this assignment.
black-whiteBlack text over a white backgroundgray-blackGray text over a black background, the default color schemegreen-blackGreen text over a black backgroundwhite-blackWhite text over a black background
Font Name String (optional) The font name. If not specified, the default font is monospace.Font Size (DPI) Dropdown (optional) The font size, in points. If not specified, the default font size is 12. Maximum Scroll Back Size (DPI) Combo box (optional) Maximum number of rows to permit within the terminal scrollback buffer. If not specified, the scrollback buffer is limited to a maximum of 1000 rows.
- Click SAVE. The profile is saved.
Whats Next?
Explore additional security features: