OpsRamp now supports multi-tenancy within a single Kubernetes cluster, allowing customers to deploy and register multiple Gateway instances either across different tenants or within the same tenant. This is achieved by leveraging Kubernetes namespaces, which enable logical isolation of Gateway services while sharing the underlying cluster infrastructure. This approach provides the efficient resource utilization, and operational scalability whether the Gateways are serving different tenants or the same tenant.
Prerequisites
Before deploying multiple Gateways using the Multi-Tenancy model, ensure the following prerequisites are met based on your deployment method:
Single-Node Deployment using OpsRamp-provided ISO/OVA
Refer to the Single-Node Deployment Guide for detailed instructions on setting up a Gateway on a standalone node using the OpsRamp-provided ISO or OVA image.Note
This method is recommended, except for inbound traffic such as SNMP traps, syslogs, and Squid proxy agents. To accommodate inbound traffic, follow the Multi-Node High Availability (HA) Deployment using OpsRamp-provided ISO/OVA details in the next point.Multi-Node High Availability (HA) Deployment using OpsRamp-provided ISO/OVA
For HA setup across multiple nodes, refer to the Multi-Node Deployment guide to configure a resilient Gateway cluster.Kubernetes Cluster with OpsRamp Bootstrap Tool
If you are deploying the Gateway in your own Kubernetes environment using the OpsRamp Bootstrap Tool, follow the steps outlined in the Install Gateway Using OpsRamp Bootstrap Tool Guide.Namespace Requirements
When implementing multi-tenancy in a Kubernetes cluster using namespaces:- A dedicated namespace must be created for each Gateway. For example, if deploying three Gateways, you must create three separate namespaces.
- Namespaces help isolate resources, configurations, and workloads, enabling better tenant separation and operational manageability.
- Ensure that your Kubernetes cluster has sufficient compute, memory, and storage resources to host multiple namespaces and their associated workloads.
- It is recommended to scale your cluster vertically or horizontally as needed to support multiple Gateways.
- For high availability and resilience, retain at least one idle node to handle failover scenarios.
Info
Proper namespace planning ensures optimal performance, security, and easier troubleshooting when managing multiple Gateways in a single Kubernetes cluster.Multi Tenancy Use cases
Use Case 1: Gateways Registered to Different Tenants
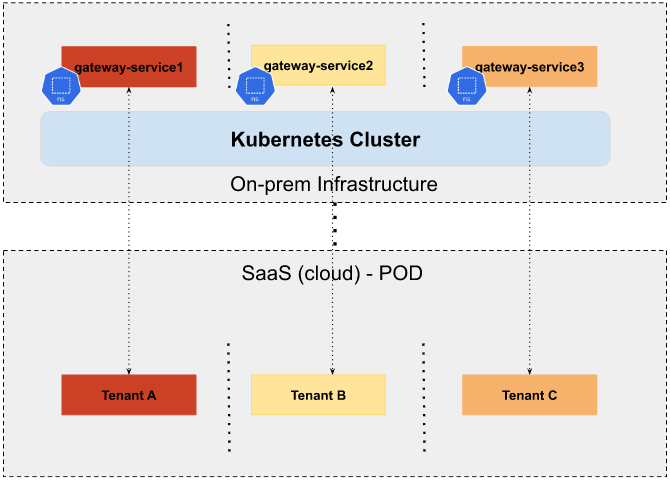
As illustrated in the diagram, each Gateway instance is deployed in its own dedicated Kubernetes namespace within the same cluster:
gateway-service1is deployed in Namespace A and registered to Tenant A.gateway-service2is deployed in Namespace B and registered to Tenant B.gateway-service3is deployed in Namespace C and registered to Tenant C.
This architecture supports scalable and isolated multi-Gateway deployments while maintaining efficient resource utilization across tenants.
Use Case 2: Multiple Gateways Registered to the Same Tenant
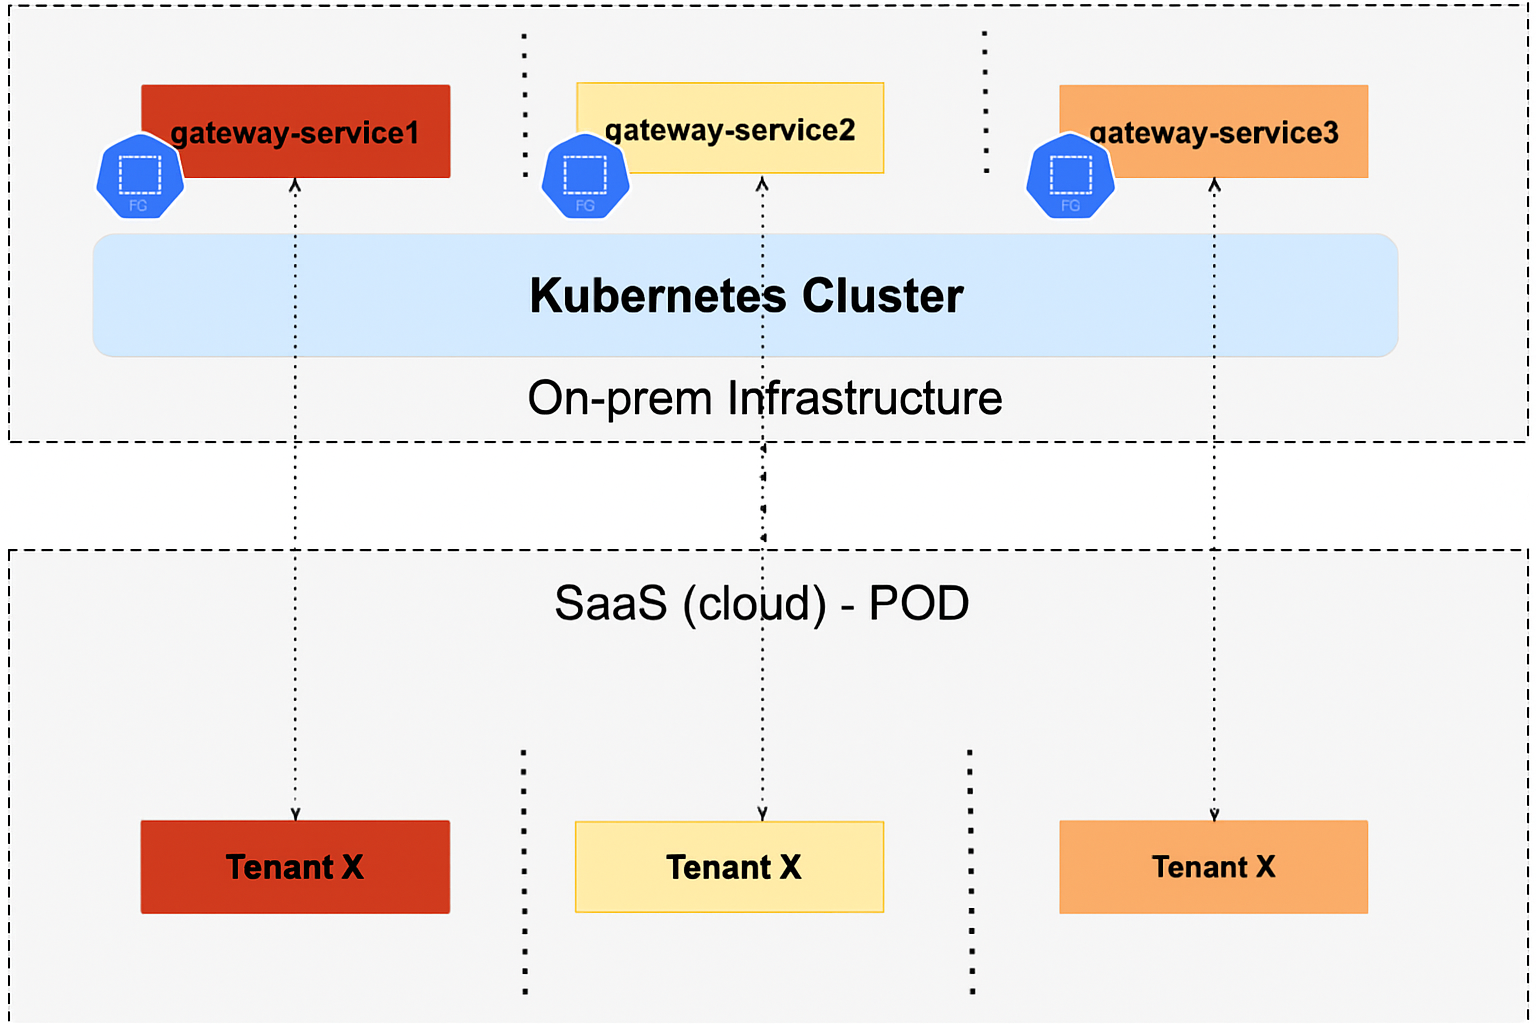
Instead of provisioning a separate Kubernetes cluster for each Gateway, you can deploy multiple Gateways in different namespaces within the same cluster, all registered to the same tenant. This enables:
- Better resource utilization
- Simplified operations
- Avoidance of cluster sprawl
Example deployment:
gateway-service1is deployed in Namespace A and registered to Tenant X.gateway-service2is deployed in Namespace B and also registered to Tenant X.gateway-service3is deployed in Namespace C and again registered to Tenant X.
By reusing the same cluster and isolating each Gateway at the namespace level, you reduce infrastructure overhead while maintaining separation and scalability. Simply scale the cluster vertically (increase resources per node) or horizontally (add more nodes) as needed to support additional Gateways.
Key Considerations for Multi-Tenant Gateway Deployments
- Namespace Isolation
- A unique Kubernetes namespace must be created for each Gateway instance.
- For example, if you plan to deploy 3 Gateways, you should pre-create 3 distinct namespaces (e.g.,
gateway-ns-1,gateway-ns-2,gateway-ns-3). - Namespace-based isolation ensures that Gateway components (pods, config maps, secrets, services) remain logically separated and manageable.
- Resource Planning
- Ensure that your Kubernetes cluster is provisioned with adequate CPU, memory, and storage to support all Gateway instances.
- Resources can be scaled either vertically (increasing the size of existing nodes) or horizontally (adding more nodes to the cluster).
- Monitor cluster usage regularly to prevent resource contention between Gateways.
- High Availability and Resilience
- It is recommended to keep at least one idle node in the cluster as a buffer for failover scenarios.
- This idle node can absorb workloads from any failed node, ensuring Gateway availability and minimizing downtime.
Note
- Both multi-tenant and same-tenant Gateway deployments are fully supported using namespace-based separation.
- This method eliminates the need for creating and managing multiple Kubernetes clusters for each Gateway, greatly reducing operational overhead.
- Recommended for organizations seeking flexibility, resilience, and cost-effective scaling.
Known Behavior
This is not a defect/bug but an expected design behavior.
In a multi-tenancy setup where multiple Gateways are registered to different tenants (Use Case 1), please be aware of the following:
- All OpsRamp Agents installed on the cluster nodes will establish connectivity with the tenant associated with the first Gateway that was registered.
- This means that while each Gateway runs in an isolated namespace and is registered to its respective tenant, the agents running on the cluster nodes will report to only one tenant—typically the one linked to the initial Gateway registration.
Example:
gateway-service1is registered to Tenant A → Agents connect to Tenant Agateway-service2is registered to Tenant B → Agents still connect to Tenant Agateway-service3is registered to Tenant C → Agents still connect to Tenant A
This behavior ensures consistent agent management and avoids ambiguity in multi-tenant environments. However, it also means that agent connectivity does not follow the Gateway-to-tenant mapping when multiple Gateways are used within the same cluster. If tenant-specific agent segregation is required, deploying Gateways in separate Kubernetes clusters is recommended.
Deployment Steps
Step 1: Create Kubernetes Namespaces
Run the following command on any node in your Kubernetes cluster to create a dedicated namespace for each Gateway instance:
kubectl create namespace <namespace-name>Example:
root@node1:/home/gateway-admin# kubectl create namespace gateway-1
namespace/gateway-1 created

root@node1:/home/gateway-admin# kubectl create namespace gateway-2
namespace/gateway-2 created
Note
Create a separate namespace for each Gateway you plan to deploy.Step 2: Register Gateways to the OpsRamp Cloud
Use the opsramp-collector-start install command to register each Gateway. Ensure the correct namespace and credentials are used for each deployment.
Register via Direct Connection (No Proxy)
opsramp-collector-start install \
  --environment {Environment} \
  --url {OpsRamp Server URL} \
  --key {Gateway Authentication Token} \
  --config {Path to YAML Config File} \
  --namespace {Namespace} \
  --gateway-name=<gateway-name>
Register through a Proxy (Without Authentication)
opsramp-collector-start install \
  --environment {Environment} \
  --url {OpsRamp Server URL} \
  --key {Gateway Authentication Token} \
  --proxy-protocol {http|https} \
  --proxy-ip {Proxy IP Address} \
  --proxy-port {Proxy Port} \
  --namespace {Namespace} \
  --gateway-name=<gateway-name>
Register through a Proxy (With Authentication)
opsramp-collector-start install \
  --environment {Environment} \
  --url {OpsRamp Server URL} \
  --key {Gateway Authentication Token} \
  --proxy-protocol {http|https} \
  --proxy-ip {Proxy IP Address} \
  --proxy-port {Proxy Port} \
  --proxy-username {Proxy Username} \
  --proxy-password {Proxy Password} \
  --namespace {Namespace} \
  --gateway-name=<gateway-name>
Example: Registering Gateway-1
opsramp-collector-start install \
  --environment k8s \
  --url gatewaytest.api.opsramp.net \
  --key 06d49ab5-a589-44f2-a68b-ee35405d5701 \
  --namespace gateway-1 \
  --gateway-name=gateway-1
Sample Output:
System requirements check passed ✔
Repository check passed ✔
Coredns status check passed ✔
OpsRamp cloud checks passed ✔
Gateway registration pre-checks passed ✔

Installing Agent...
Pulled: opsramp-nextgen-agent:2.0.0
NAMESPACE: gateway-1
STATUS: deployed

Pulled: nextgen-gw:19.0.0
NAMESPACE: gateway-1
STATUS: deployed

OpsRamp Gateway installed successfully.
Example: Registering Gateway-2
opsramp-collector-start install \
  --environment k8s \
  --url gatewaytest.api.opsramp.net \
  --key 28128ba2-72de-4f92-8c79-362c778d1744 \
  --namespace gateway-2 \
  --gateway-name=gateway-2
Sample Output:
System requirements check passed ✔
Repository check passed ✔
Coredns status check passed ✔
OpsRamp cloud checks passed ✔
Gateway registration pre-checks passed ✔

OpsRamp Agent already installed
Pulled: nextgen-gw:19.0.0
NAMESPACE: gateway-2
STATUS: deployed

OpsRamp Gateway installed successfully.
Step 3: Post-Installation Validation
After deploying the Gateways, validate their status:
Check Gateway Pod Status:
Replace
Example:
kubectl get pods -n gateway-1
kubectl get pods -n gateway-2*Sample Outputs
Check Tunnel Status:
Ensure each Gateway has successfully established a tunnel connection to the OpsRamp Cloud. Use the OpsRamp UI or CLI as applicable to verify tunnel status.